blankhomeaboutthe fammy faithwhats cookinget crafty

Wednesday, May 29, 2013

Pineapple, Banana and Coconut Fruit Roll-Ups

Have you ever opened your freezer door or looked into your pantry and wondered how on earth it got so jam packed with food? Good intentioned ingredients for good intentioned recipes that never got made? Your local grocery store had a great sale on an item and you stocked up? Whatever the reason may be, I found myself in this exact predicament. I couldn't even fit a toothpick into my freezer if I had wanted to. 
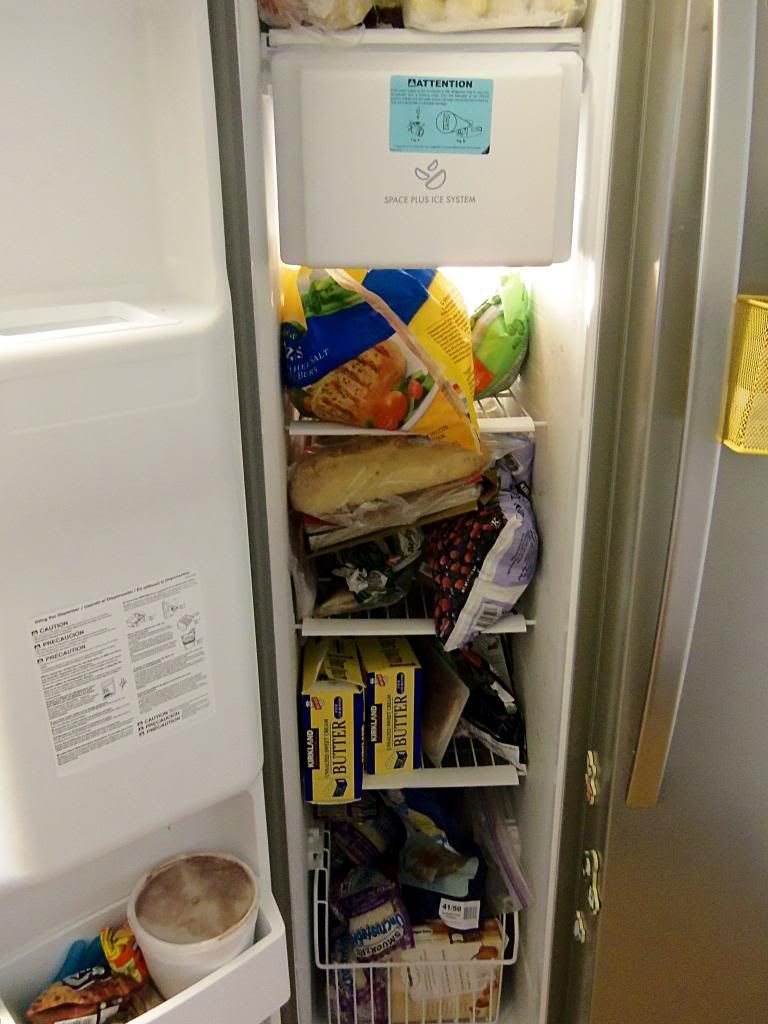
Normally I make a grocery list every weekend for an entire weeks worth of meals, lunches, snacks, etc. and then go shopping Monday morning. This time I scoured my freezer and pantry to take inventory of what I had and instead made a list of just a few ingredients that I needed to complete a dish using what I already had. Some of our meals this week include, enchiladas, chicken quinoa fried rice, seaweed spring rolls and BBQ'd salmon with a mango salsa. Now that my freezer and pantry cabinets are definitely starting to thin out I can actually see inside them and noticed this morning that I had two large cans of crushed pineapple sitting on a shelf of which I cannot tell you for what reason I had ever bought them for? No matter, because I came up with what I think is an ingenious way to use them. I decided to make pineapple, banana and coconut dried fruit leather . 
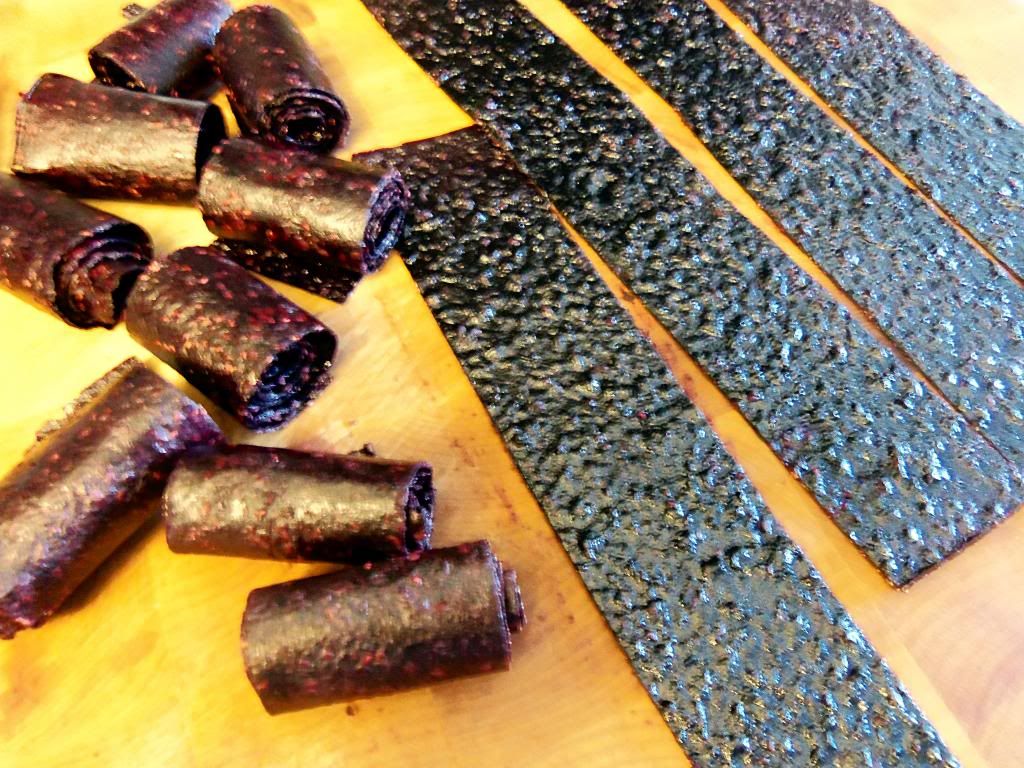
Fruit leather has been on mind the last couple of days because amongst the array of things in my freezer were two bags of frozen mixed berries. So to finally put them to good use after almost two years I blended them up and made some fruit leather for my son. He absolutely looooves them and has been asking for roll-ups all week. Best part is I don't have to feel guilty about letting him have what he thinks is a sweet because all it is is blended frozen berries with a few tablespoons of honey. 
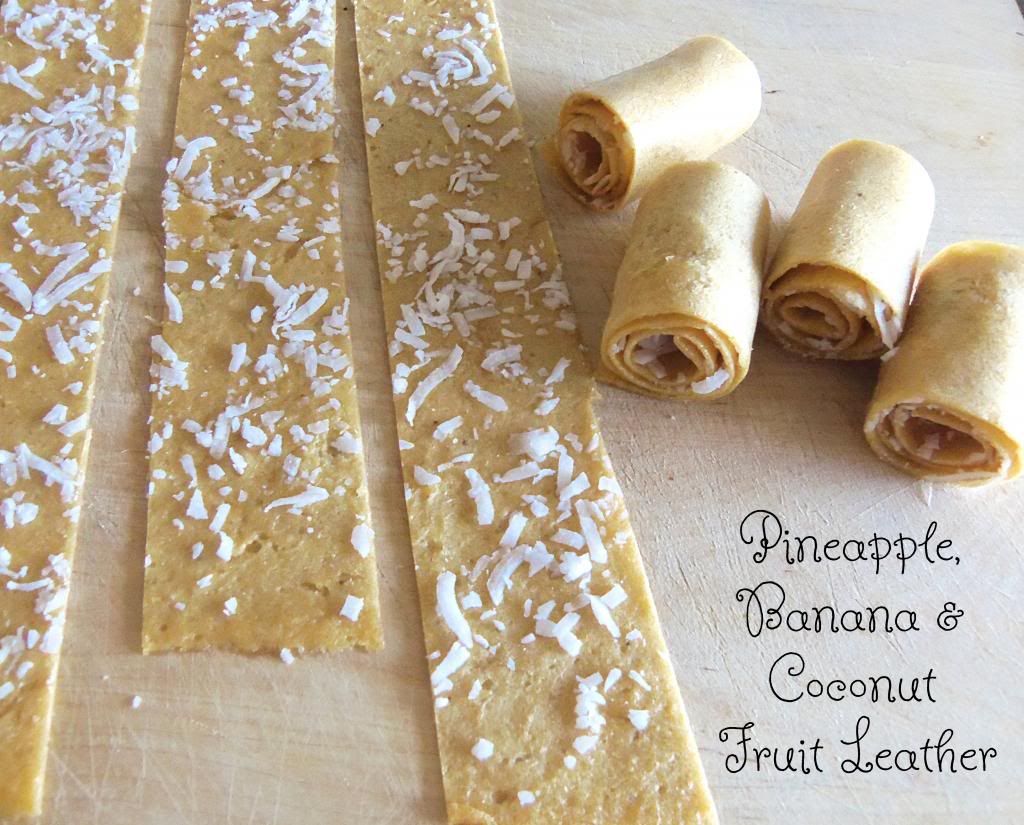
So since my mind was already focused on fruit leather it was a no brainer when I saw the cans of pineapple. I knew exactly what I wanted to make with them. And I knew that my son would love me forever for making these pineapple, banana, coconut fruit roll-ups!! Up until this point I thought I had tried about every combo of fruit roll-ups and I thought my favorite was any type of berry fruit leather. My world changed when I tried my first bite of this pineapple, banana, coconut fruit roll-up. I had never tasted anything like it! Good is not even the right word to describe it because it was almost magical!! In fact I stood over my cutting board and devoured what seemed like an entire pan. It's probably safe to say that I will never ever make another flavor of fruit leather again except this one!

Pineapple, Banana, Coconut Fruit Roll-Ups

Ingredients:
2 20-ounce cans crushed pineapple in 100% pineapple juice
1 ripe banana
2-3 tablespoons honey
1 cup coconut flakes

Directions:
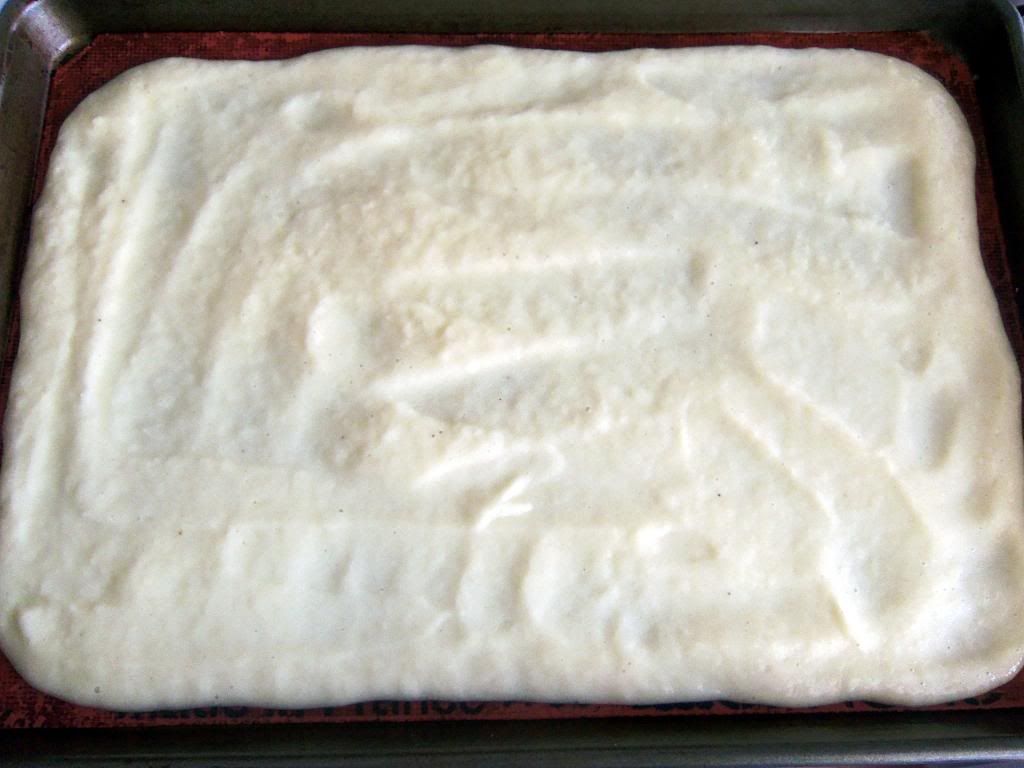
Preheat your oven to 170 degrees. In a blender add both cans of crushed pineapple, banana and honey. Blend until smooth and incorporated.
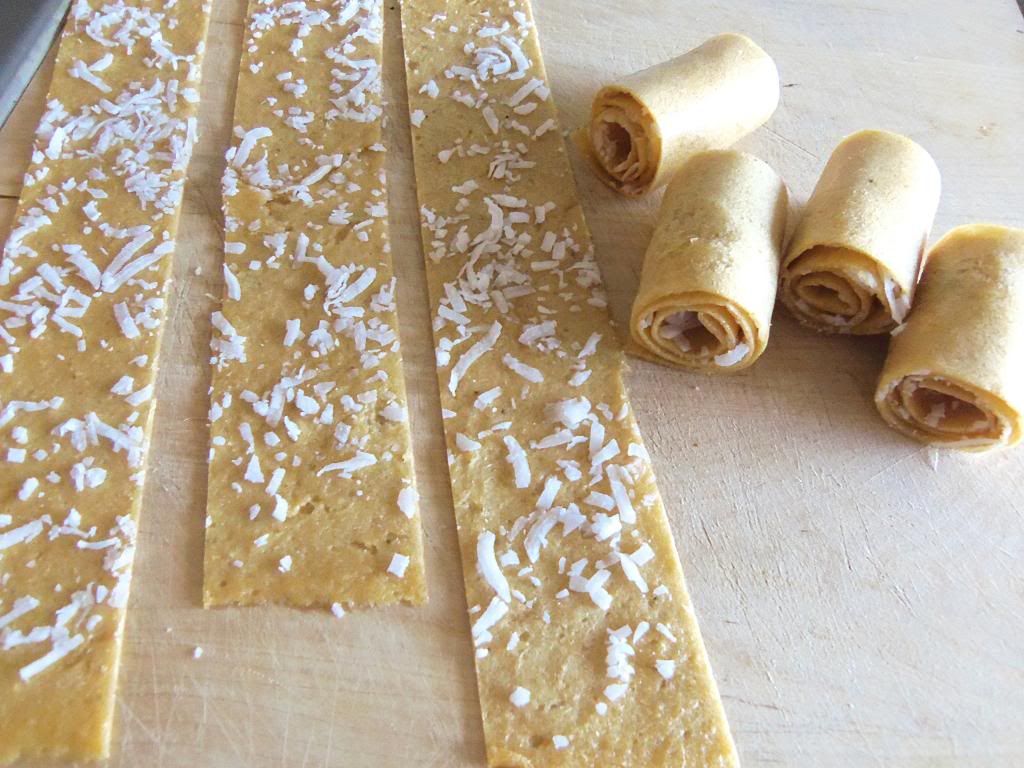
Spread the mixture onto a cookie sheet lined with a silpat or parchment paper. Don't pour too much onto your pan. You want a thin layer about 1/8 inch thick, with the outside edges a bit thicker than the middle since the edges will dry faster. I baked two pans at a time and was able to make three large size pans of fruit leather with this recipe. 
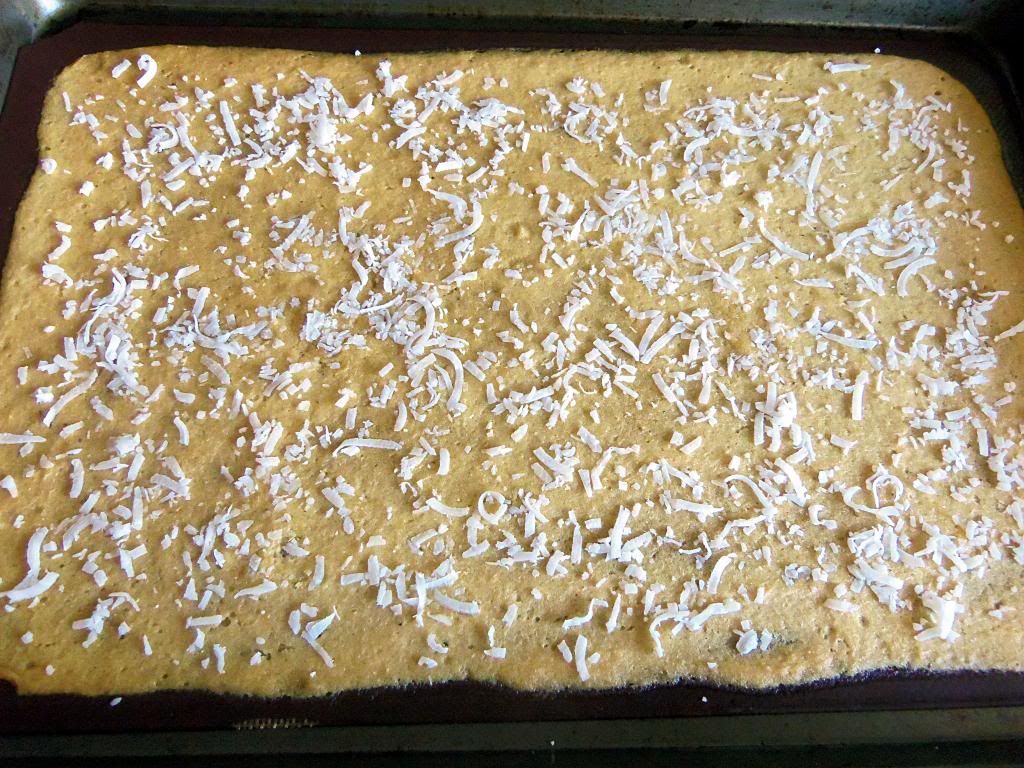
Place your pan(s) in the oven and bake for between 6-8 hours. About 3/4 of the way, take out your pan and sprinkle the pineapple mixture with coconut flakes. At this point the fruit leather should not be completely set, it should still be somewhat wet. Gently pat down the coconut to make sure it has set into the pineapple puree. 
Place back into the oven for the remainder of the time. Keep an eye on your fruit leather as the time starts to wind down. Once the middle of the leather is barely tacky and does not come off onto your hand when you touch it, it is time to take it out of the oven and let it rest until completely cooled. Once cooled you can remove the leather from the pan and cut it into strips and roll them up to store! But I promise...they wont last long!!

Wednesday, May 22, 2013

Ooey Gooey Soft and Chewy Kitchen Sink Brownies


Recently I had all of my nieces and nephews coming over for dinner. I was struggling to think of something for dessert that they would all like. One doesn't like coconut, one doesn't like nuts, another frosting, another cookies. You see my dilemma. What I was pretty sure of was that they all like chocolate. So in an effort to appease all taste buds I decided to throw in every kind of chocolate I had on hand into a brownie batter and toss in some toffee bits and caramel just to cover my bases :) In fact it felt like I was throwing in everything but the kitchen sink...hence the name.
Can you really go wrong with brownies loaded with milk chocolate, white chocolate, bitter sweet chocolate, caramel and toffee pieces. Me thinks not!! In fact some of the toffee pieces sink to the bottom  of the batter while cooking and create an incredible chewy and sweet layer to the base of the brownies. These brownies are seriously over the top soft, chewy and sinful. You will definitely need a glass of milk and a chair while consuming :)

Ooey Gooey Soft and Chewy Kitchen Sink Brownies

Ingredients:
2 boxes store bought brownie mix
2/3 cup vegetable oil
2/3 cup water
2 eggs
3/4 1 cup bittersweet chocolate chips
3/4 cup Heath pieces
3/4 cup white chocolate chips
3/4 cup milk chocolate chips
14 individually wrapped caramels

Directions:
Preheat oven to 325 degrees. Prepare a 9x13 inch pan with non stick cooking spray. Remove the wrappers from your caramels and cut each one in half. 

In a large bowl mix together all ingredients except caramels. 
Poor batter into prepared pan and cook for 25 minutes.  Remove pan from oven and place caramel pieces evenly on top of batter. Push them in just slightly so that they are half covered. Bake an additional 25-30 minutes or until toothpick or knife inserted comes out fairly clean. Let cool completely before cutting. 

Wednesday, May 15, 2013

Traditional Margarita Pizza

The other day as I was lying in bed, pregnant and sick as can be. I tried distracting my emotionally drained mind and physically drained body, with one of  Rick Steves' Europe travel show on PBS. I love watching Rick Steves' and secretly wish I was a part of his camera crew or make-up crew or even his water girl, and could travel to all of the amazing countries and discover fun and food. This particular episode featured Naples. I had been there, over 11  years ago, and was interested to see where he would go and what he would see. Memories started to flood my brain and it was at that instant that Mr Steves' walked into THE most famous pizza place in Naples, in all of Italy I might say, to stop for a bite to eat. Oh my goodness! Pizzeria da Michele, I had been there and it was everything we had been told and more. 
We waited in line for what felt like centuries but once we ordered, sat down and were served it was a symphony in my mouth!!! You could say the restaurant is for pizza purists as the menu consisted of only two options of pizzas: margarita and marinara; much unlike our American pizzerias.
The pizza was so perfect they only needed two choices. When you are using the best and freshest ingredients why not limit the options and stick to what works best. The crust was perfect, not thick and not thin but so fresh. I ordered the margarita which came with a freshly made marinara sauce, tossed with fresh mozzarella and sprinkled with torn basil, then thrown in a fire oven and served pipping hot. At first glance you would be tempted to share the pizza with at least 3 friends since it was so big it hung over the serving plate at least 3 inches all around. But! Since the bread was not overwhelming and there was limited toppings it was not hard to finish the entire thing on your own...and that is exactly what I did!
After watching this episode I new there was only one thing I HAD to have for dinner...Margarita Pizza! And make it I did...consecutively for the next 3 days :)

Margarita Pizza

Ingredients:
Dough (makes two medium pizzas or one thick crusted pizza)-
1 1/2 cups luke warm water
1 tablespoon yeast
3/4 tablespoon salt
3 1/4 cups flour

Tomato Sauce-
See recipe/previous post here

Pizza-
finely ground corn meal
Fresh mozzarella
10 or so basil leaves, sliced, divided
olive oil

Directions:
Dough-
Start by placing your water into a LARGE Tupperware container and add your yeast. Let sit for a few minutes then add your salt and stir. Add your flour and with a wooden spoon roughly mix together your ingredients just until all of your flour is mixed in. There is no need to knead your dough or over mix it. Place the lid on your Tupperware container then pop up one corner to allow for the gases from the yeast to escape. Let sit on your counter for at least two hours. At that point you can either make and bake your pizza or place your dough into the refrigerator to use at a later date, for up to two days.
Tomato Sauce-
Follow my recipe here for the BEST tomato sauce you will ever taste in your life!!
Pizza-
Once you are ready to bake your pizza, preheat your oven to 425 degrees. If you are using a pizza stone or pizza pan make sure that your stone/pan is in the oven while it is preheating. Sprinkle your pizza peal liberally with fine ground corn meal to prevent your pizza from sticking when sliding it onto your stone or pan. Take half of your dough from your Tupperware and form into a circle being sure to stretch it evenly. Place onto pizza peel. Spoon tomato sauce over dough and spread evenly. Top with slices of fresh mozzarella, sprinkle with 3/4 of your sliced basil and drizzle with a few tablespoons of olive oil. Slide pizza into oven onto stone or pan and bake for 15 minutes. Remove from oven with pizza peel, sprinkle with the rest of your basil and a few more drizzles of good olive oil, slice, and serve hot.

Tuesday, May 14, 2013

It's a...

It's a.............


Boy!!!!!!

Yup thats right we are having another little dude! Before the technician even asked us if we wanted to know the gender I knew. As she was scanning all the body parts and taking measurements I was pretty sure I caught a glimpse of a little something indicating it was a boy. Was I a little disappointed it was not a girl...yes. Maybe even a little more than disappointed actually. BUT! As I continued through the day thinking about the pregnancy I became more and more excited that we were having a little boy for more than one reason:

-Boys love their mamas!
-We already know how to raise a boy
-Easton will graciously be donated/sharing his boy toys, clothes, blankets, etc.
-Easton will have a blast playing with a little brother buddy!

These are just a few of the reasons why having a boy will be amazing for our family. In all honesty, boy, girl, it didn't really ever matter. Creating a baby is such an incredible miracle that we feel so blessed to be given the opportunity again to grow our family. We could have never imagined how amazing raising children could be and we wouldn't trade being parents for anything in the entire world. 


Wednesday, May 8, 2013

Lavender Crusted Pork Chops

My dream as a child was to grow up, get married and live in the country where one of my first priorities would be to let down my hair, put on a summer dress and run free whilst sprinkling wild flower seeds over every inch of my property. Reality check...that hasn't happened yet; well at least the running through fields of flowers part. But I do still have some kind of romantic fantasy of looking outside my kitchen window at a field full of wild flowers.
  My closest encounter to that experience was visiting the Ali'i Kula Lavender Farm in Maui earlier this year. The rows and rows of beautiful purple blossoming lavender kept me grinning from ear to ear. And the smell, oh the smell, robust, earthy and sweet all in the same note. My fantasy field of flowers now includes tons and tons of lavender plants. And since I am still waiting for my dream to materialize I decided I could do the next best thing; cook with it...lavender that is. I have been trying to incorporate it in a variety of ways: salad dressings, marinades, desserts, etc. Which is why I am so excited about sharing this recipes with you. 

 For this recipe I purchased some culinary lavender online and I am sure that some specialty markets may even carry it as well. So don't go picking your neighborhood landscaping lavender, you gotta get the cooking kind.

Lavender Crusted Pork Chops

Ingredients
4 pork chops
1 teaspoon course salt
1 teaspoon black pepper
1-2 teaspoons dried culinary lavender
4 teaspoons fresh thyme, minced
2 teaspoons fresh rosemary, minced
1/4 cup olive oil

Directions:
In a small bowl combine salt, pepper, lavender, thyme, rosemary and olive oil. Rub mixture liberally over chops. Cover and let sit overnight or at least 4 hours. 

Once ready to cook your pork chops heat your skillet over medium high heat and cook the pork until the internal temperature reaches 155 degrees F. If cooking cover a grill, BBQ until meats internal temperature reaches at least 155 degrees F. Serve and enjoy!

Wednesday, May 1, 2013

Salted Caramel, Pecan & Chocolate Cupcake


This recipe should come with a serious *DANGER* warning! I mean it has just about every vice known to man piled atop a cupcake. Salted butter cream, chocolate, caramel and pecans! It really should be placed on a pedestal and admired for at least an hour before being eaten; and your going to wish you made a double batch because I promise these will disappear the first day you make them. They are definitely a special special cupcake that should only be shared with folks you really really love...a lot! :) It is a masterpiece that your tastebuds will definitely thank you for!

Salted Caramel, Pecan & Chocolate Cupcake

Ingredients:

Cupcake-
1 box chocolate cake mix if your going the easy route, otherwise use your favorite homemade chocolate cupcake recipe

Caramel-
3/4 cup sugar
4 tablespoons water
1 tablespoons plus 4 teaspoons heavy whipping cream

Salted Caramel Buttercream-
2 egg whites
pinch of salt
1/2 cup butter, softened
1/2 teaspoon vanilla extract

Toppings-
pecans, chopped
milk chocolate chips for melting and drizzling

Directions:
Cupcakes-
Bake cupcakes according to package or recipe directions and let cool completely before frosting

Caramel-
Have your heavy cream measured out before you start to make the carmel. Place 1/2 cup of sugar and water in a saucepan over medium high heat. Do not stir , only swirl the saucepan gently.  Do not leave the pan; once the caramel starts to turn color it will happen in a matter of seconds. It will start to bubble and begin to reach a deep amber color. Remove immediately from the heat once this amber color is reached and add the cream. Be careful, it will bubble up furiously! Stir until smooth. Divide the caramel sauce into two separate and equal portions and set aside.

Salted Caramel Buttercream-
Place egg whites, salt and 1/4 cup of sugar in a heatproof bowl over a pot of simmering water. Whisk until sugar dissolves and mixture reaches 140 degrees. Transfer mixture to the bowl of a standing mixer and beat on high until stiff peaks form. Once you have stiff peaks add the butter a little bit at a time and continue to beat on high. Reduce speed to low and add vanilla extract. Once incorporated add one of your portions of caramel sauce. You may need to microwave the caramel gently to soften it up for mixing in. Beat on high for 4-5 minutes or until buttercream texture is reached.

Assembly-
Pipe your buttercream frosting onto each cupcake and roll the sides in chopped pecans. Drizzle the tops of your cupcakes with melted chocolate and your remaining portion of caramel. Sprinkle each cupcake ever so lightly with course sea salt.


Blogging tips